|
COSA
An Object-Oriented Platform for Arduino Programming
|
|
COSA
An Object-Oriented Platform for Arduino Programming
|
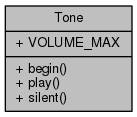
#include <Tone.hh>

Static Public Member Functions | |
| static void | begin () |
| static void | play (uint16_t freq, uint8_t volume=VOLUME_MAX/2, uint16_t duration=0, bool background=false) |
| static void | silent () |
Static Public Attributes | |
| static const uint8_t | VOLUME_MAX = 10 |
Friends | |
| void | TIMER1_COMPA_vect (void) |
Cosa tone/toneAC library with the advantage of nearly twice the volume, higher frequencies (even if running at a lower clock speed), higher quality (less clicking), nearly 1.5k smaller compiled code and less stress on the speaker. Disadvantages are that it must use certain pins and it uses two pins instead of one. But, if you're flexible with your pin choices, this is a great upgrade. It also uses timer 1 instead of timer 2, which may free up a conflict you have with the tone library. It exclusively uses port registers for the fastest and smallest code possible.
Connection is very similar to a piezo or standard speaker. Except, instead of connecting one speaker wire to ground you connect both speaker wires to Arduino pins. The pins you connect to are specific, as the class lets the ATmega microcontroller do all the pin timing and switching. This is important due to the high switching speed possible and to make sure the pins are alyways perfectly out of phase with each other (push/pull). See the below section for which pins to use for different Arduino boards. Just as usual when connecting a speaker, make sure you add an inline 100 ohm resistor between one of the pins and the speaker wire.
Pins 9 & 10 - ATmega328, ATmega128, ATmega640, Uno, Leonardo, etc. Pins 11 & 12 - ATmega2560/2561, ATmega1280/1281, Mega Pins 12 & 13 - ATmega1284P, ATmega644, Mighty Pins 14 & 15 - ATmega32U4, Teensy 2.0
The original code was created by Tim Eckel - teckel@leethost.com. Copyright 2013 License: GNU GPL v3 http://www.gnu.org/licenses/gpl-3.0.html
1, toneAC Arduino Library, https://code.google.com/p/arduino-tone-ac/
The Tone class uses Timer#1 and cannot be used together with other classes that use the same timer (e.g. VWI).
|
static |
|
static |
|
friend |